Microsoft HoloLens is equipped with a diverse array of sensors, making it an incredibly powerful tool. Worn on the head, it offers a unique perspective of the surroundings. This guide demonstrates how to capture photos using HoloLens and project them onto holographic surfaces, as well as how to record and playback videos.
Begin by creating a new scene named ‘Capture-Play-Photo-Video.’ It’s essential to configure the scene’s Camera with a perspective projection. Ensure that you are positioned correctly, as illustrated in the image: Position (0, -0.02, 0), Rotation (0, 0, 0), and Scale (1, 1, 1). It’s worth noting that the camera’s placement serves as the reference point for initializing other objects in the spatial environment.

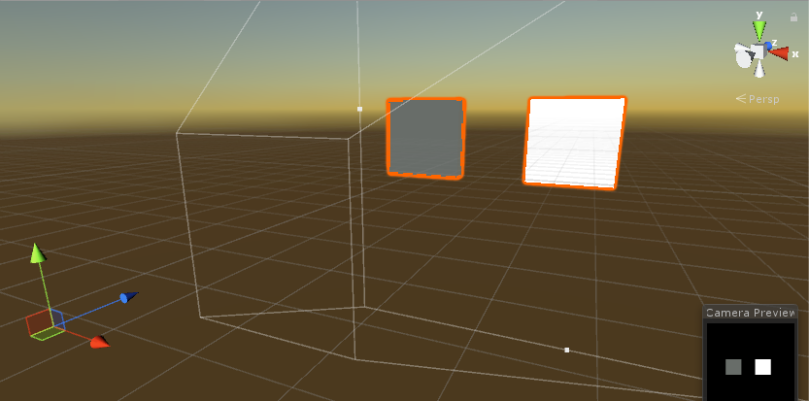
Add two new GameObjects in the Unity scene, naming them ‘DisplayPhoto’ and ‘PlayVideo.’ Apply the following transformations to these objects:


Introduce a new GameObject into the scene, labeling it ‘CaptureManager.’ This GameObject will house several scripts:
- ‘KeywordGlobalManager.cs’ – Enabling functions for Capture Photo, Start Recording, and Stop Recording.
- ‘PhotoCaptureHandler.cs’ – Responsible for managing the capture photo mode.
- ‘RecordVideoHandler.cs’ – In charge of overseeing the record video mode.
- ‘UIManager.cs’ – Handles the display of photos on the ‘DisplayPhoto’ GameObject and the playback of videos on the ‘PlayVideo’ GameObject.
PhotoCaptureHandler.cs
public class PhotoCaptureHandler : MonoBehaviour
{
    PhotoCapture photoCapture = null;

    public void StartPhotoCapture()
    {
        PhotoCapture.CreateAsync(false, OnPhotoCaptureCreated);
    }

    void OnPhotoCaptureCreated(PhotoCapture captureObject)
    {
        photoCapture = captureObject;

        Resolution cameraResolution = PhotoCapture.SupportedResolutions.OrderByDescending((res) => res.width * res.height).First();

        CameraParameters c = new CameraParameters();
        c.hologramOpacity = 0.0f;
        c.cameraResolutionWidth = cameraResolution.width;
        c.cameraResolutionHeight = cameraResolution.height;
        c.pixelFormat = CapturePixelFormat.BGRA32;

        captureObject.StartPhotoModeAsync(c, OnPhotoModeStarted);
    }

    private void OnStoppedPhotoMode(PhotoCapture.PhotoCaptureResult result)
    {
        photoCapture.Dispose();
        photoCapture = null;
    }

    private void OnPhotoModeStarted(PhotoCapture.PhotoCaptureResult result)
    {
        if (result.success)
        {
            try
            {
                photoCapture.TakePhotoAsync(OnCapturedPhotoToMemory);
            }
            catch (System.ArgumentException e)
            {
                Debug.LogError("System.ArgumentException:\n" + e.Message);
            }
        }
        else
        {
            Debug.LogError("Unable to start photo mode!");
        }
    }

    void OnCapturedPhotoToDisk(PhotoCapture.PhotoCaptureResult result)
    {
        if (result.success)
        {
            Debug.Log("Saved Photo to disk!");
            photoCapture.StopPhotoModeAsync(OnStoppedPhotoMode);
        }
        else
        {
            Debug.Log("Failed to save Photo to disk");
        }
    }

    void OnCapturedPhotoToMemory(PhotoCapture.PhotoCaptureResult result, PhotoCaptureFrame photoCaptureFrame)
    {
        if (result.success)
        {
            List<byte> imageBufferList = new List<byte>();

            Debug.Log("OnCapturedPhotoToMemory Copy Started");

            photoCaptureFrame.CopyRawImageDataIntoBuffer(imageBufferList);

            Debug.Log("OnCapturedPhotoToMemory " + imageBufferList.Count);

            Resolution cameraResolution = PhotoCapture.SupportedResolutions.OrderByDescending((res) => res.width * res.height).First();
            Texture2D texture = new Texture2D(cameraResolution.width, cameraResolution.height);
            photoCaptureFrame.UploadImageDataToTexture(texture);

            UIManager.Instance.LoadPhotoToTexture(texture);
        }
        else
        {
            Debug.Log("Failed to save Photo to memory");
        }

        photoCapture.StopPhotoModeAsync(OnStoppedPhotoMode);
    }
}
RecordVideoHandler.cs
public class RecordVideoHandler : MonoBehaviour {

    VideoCapture m_VideoCapture = null;

    public void StartRecordingVideo()
    {
        VideoCapture.CreateAsync(false, OnVideoCaptureCreated);
    }

    public void StopRecordingVideo()
    {
        m_VideoCapture.StopRecordingAsync(OnStoppedRecordingVideo);
    }

    void OnVideoCaptureCreated(VideoCapture videoCapture)
    {
        if (videoCapture != null)
        {
            m_VideoCapture = videoCapture;

            Resolution cameraResolution = VideoCapture.SupportedResolutions.OrderByDescending((res) => res.width * res.height).First();
            float cameraFramerate = VideoCapture.GetSupportedFrameRatesForResolution(cameraResolution).OrderByDescending((fps) => fps).First();

            CameraParameters cameraParameters = new CameraParameters();
            cameraParameters.hologramOpacity = 0.0f;
            cameraParameters.frameRate = cameraFramerate;
            cameraParameters.cameraResolutionWidth = cameraResolution.width;
            cameraParameters.cameraResolutionHeight = cameraResolution.height;
            cameraParameters.pixelFormat = CapturePixelFormat.BGRA32;

            m_VideoCapture.StartVideoModeAsync(cameraParameters,
                                                VideoCapture.AudioState.None,
                                                OnStartedVideoCaptureMode);
        }
        else
        {
            Debug.LogError("Failed to create VideoCapture Instance!");
        }
    }

    void OnStartedVideoCaptureMode(VideoCapture.VideoCaptureResult result)
    {
        if (result.success)
        {
            string filename = string.Format("MyVideo_{0}.mp4", Time.time);
            string filepath = System.IO.Path.Combine(Application.persistentDataPath, filename);

            m_VideoCapture.StartRecordingAsync(filepath, OnStartedRecordingVideo);
        }
    }

    void OnStartedRecordingVideo(VideoCapture.VideoCaptureResult result)
    {
        Debug.Log("Started Recording Video!");
    }

    void OnStoppedRecordingVideo(VideoCapture.VideoCaptureResult result)
    {
        Debug.Log("Stopped Recording Video!");
        m_VideoCapture.StopVideoModeAsync(OnStoppedVideoCaptureMode);
    }

    void OnStoppedVideoCaptureMode(VideoCapture.VideoCaptureResult result)
    {
        m_VideoCapture.Dispose();
        m_VideoCapture = null;
    }
}
UIManager.cs
public class UIManager : MonoBehaviour {

    public static UIManager Instance { get; private set; }

    public GameObject gameObjDisplayPhoto;
    public GameObject gameObjPlayVideo;
    void Awake()
    {
        Instance = this;
    }

    public void LoadPhotoToTexture(Texture2D texture)
    {
        gameObjDisplayPhoto.GetComponent<MeshRenderer>().materials[0].SetTexture("_MainTex", texture);
    }

    public void PlayVideo()
    {
        ((MovieTexture)gameObjPlayVideo.GetComponent<Renderer>().material.mainTexture).Play();
    }
}
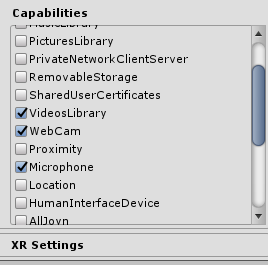
Finally, you’ll need to enable certain capabilities to grant access to the camera, sound, and more. In Unity, go to ‘Edit’ -> ‘Project Settings’ -> ‘Player.’ In the ‘Publishing settings’ tab, navigate to the ‘Capabilities’ section and ensure that the following options are checked: ‘Video Library,’ ‘WebCam,’ and ‘Microphone.
To capture and display a photo, use the voice command ‘Capture Photo.’ To initiate video recording, say ‘Start Recording.’ To stop recording the video and play it on a holographic surface, issue the command ‘Stop Recording.
You can access and download this sample from the following GitHub link: https://github.com/gntakakis/Hololens-Capture-Play-Photo-Video-Unity.
